Saturday, March 12, 2016

10 Easy Steps to Create a Watermark


1. 
Open a new document in Adobe Illustrator
File -> Cmd N
1080 px by 1080 px


2.
Using Type tool
Set stroke size to 1 pt
Character to chosen font 
Set font size to 100 pt
Paragraph to centred


3.
 Write your name
 Press Option key and G to get © symbol on Mac
 Write the year
(You can use a logo instead of your name)


4.
Save as an .ai file

5.
Open the saved .ai file in Photoshop
An Import pdf document will open, change the maximum
image size to be 1080 px.


6.  
Go to Edit -> Define Brush Preset 
Type in a name then press OK
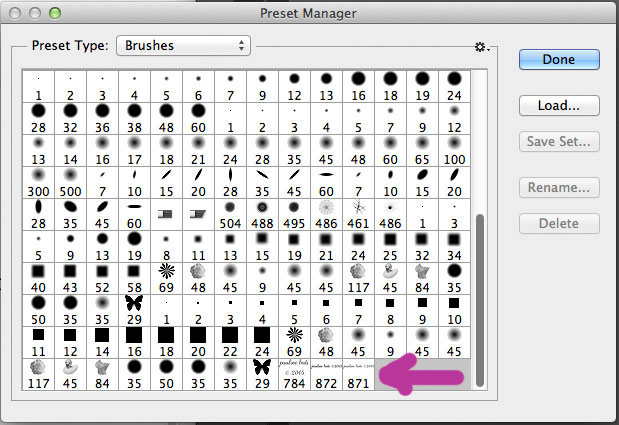


7. 
Click on Brushes symbol on right of screen
Click on Brush Preset Manager icon (looks like a grid pattern)
Scroll down to bottom of sample brushes
(last one is probably the watermark brush just created)
Click on newly created watermark brush and move it to the top of the brush samples (this makes finding the brush very easy)
Click Done


8.
Open a Photoshop Image
Press Command Shift N to open a new layer (very important step!!!!!!!!!!)


9.
Use your new watermark brush


10.
Command T allows you to re-size and move the watermark 
Opacity allows you to fade the watermark if it is too obvious
Colour picker allows you to sample a colour from your image to make your watermark blend better


Comments.
You can use Photoshop to create your watermark image but 
the beauty of Adobe Illustrator is that the image is vector-based and thus infinitely scalable.
I used Rouge Script for my watermark font.  I got the free downloadable font from here.  Then, I searched under calligraphy for a font I liked and that was also in the public domain.

I hope you find it as easy as I did to create your own watermark.

Luv pauline
  

Tuesday, January 26, 2016

Cute Whale Quilt Panel and TIPS!!!

Third one's a charm.


This panel was created by Joyce's Sewing Shop just outside London, Ontario  A nice, easy panel to make which was a relief because yesterday's and the next one are complicated.

TIPS

  1. Elmer's Washable Glue Stick worked perfectly for this application.  I cut the pieces out and then spread the glue on the reverse and finger pressed it into place.  While sewing I made sure the edges were firmly pushed down and then did a zig-zag stitch to permanently hold the pieces down.  The glue stick worked perfectly as a temporary hold.  
  2. Zig-zag stitch problems occurred when there was a build up of lint in the bobbin area.  I had to remove the bobbin holder and the throat plate to get all of the lint out. After cleaning, the zig-zag stitch would be uniform with no missed stitches.
Stitch on!
Pauline

Monday, January 25, 2016

Under the Water Quilt Panel

Second one done!


 This one took a lot longer than I expected.  Thankfully, the finished look is cheerful otherwise I would be crankier than normal.  Under the Water is another 2015 Row by Row panel from SewEtc in Burlington.   I loved this store but haven't had a chance to get back there.

I complained about Heat n Bond in the last post but Steam a Seam2 was even worse.  I will never willingly use it again.  It claims to never gum up your needle.  It does.  It failed to stick to some of the fabrics.  I still needed to zig-zag stitch around all the pieces, partly because I want a bed quilt not a wallhanging and partly because some of the pieces weren't sticking properly.

Instead of using a fusible web for the next panel I'm going to try Elmer's washable glue stick.  If that doesn't work then I'm going to appliqué the pieces down. It can't be any worse.  Can it?

I hope your sewing is going well.  If you have any suggestions for placing the pieces down please let me know.  Thanks, Pauline

Saturday, January 23, 2016

Deck Chairs - Row by Row

I'm finally getting going on the 2015 Row by Row quilt panels.  The first one I attempted was created by Heart'N Home in New Hamburg.  I loved the fact that we could chose different variations of colours for the deck chairs and the sky and if we wanted sand or grass under the chairs.

What I didn't love was the use of heat n bond to fuse the chairs to the background fabric.  The fabric frayed and every time I look at the chairs I see yet another tiny piece of unsecured thread hanging off the edges.  I ended up trying a blanket stitch to tack them down but it looked messy and so I used a narrow zig-zag around the edges.  Better but still not great.


I've got a lot of ideas for the quilting.  A sandcastle, a sunbrella, and a pail will be added and then the clouds, water, and sand will get some detailing, too.  But...that will have to wait until the other panels are completed and joined into the top.

Until tomorrow, when I'm sure I'll have another panel to post....yeah, right.

Cheers, Pauline

Saturday, July 25, 2015

Swap-Bot: Digital Photo Email Scavenger Hunt - July

I signed up for my first swap-bot and here are the results of my scavenger hunt.  I had lots of fun searching for the items and of course, the fact that a camera was required made it that much more enjoyable for me.

Thursday, July 23, 2015

Waves

I've been thinking about how to add interest to my fish quilt.
See original Fish post here

I've also been practising some free motion quilting on my domestic but until this head cold takes a hike I'm not willing to work on the real item.


Here's a design that appeals.  It will obviously be spread out over a greater width but the idea is there.  I used my Wacom tablet and Adobe Illustrator to play with the image.


That's all for today, 

Luv Pauline


Friday, July 10, 2015

In Honour of Fred the Fish I, II, III, IV, and V

I adore goldfish.  Unfortunately, as you can tell from the title I've shared my life with a few.

I used to go to the yearly carnival and with the exorbitant cost of a quarter be allowed to toss a ping pong ball into a small glass bowl and win, yet another goldfish.   Every year, my dad would exclaim don't let her near the fish game she'll win.  Unfortunately for him some unscrupulous person would hand me a quarter and we'd have yet another goldfish that I promptly named Fred.

Many years later I was still a temporary caretaker to a series of Freds.  My kids got into the act by demanding that the next fish NOT be named Fred.  Chutney was the choice and he stayed with us for many years.

I've been working on a memorial quilt to honour Fred.  This is how he looks so far.  I haven't figured out how to attach him.  He was created using angelina fibres, film, and wire.  More on that another time.


Luv pauline
Goldfish, anyone?